RAF Command Uxbridge
RAF Uxbridge, located in West London, was a key command centre during the Second World War and played a decisive role in the Battle of Britain. It was home to the No. 11 Group Operations Room, an underground command bunker responsible for directing the defence of Southeast England, including London—then the prime target of the German Luftwaffe. From this bunker, senior RAF officers, controllers, and supporting staff coordinated real-time aerial operations that would become pivotal in defending Britain from invasion.
Commanded by Air Vice-Marshal Keith Park, No. 11 Group was one of several regional divisions under RAF Fighter Command. While the larger strategic planning came from Fighter Command HQ at Bentley Priory, it was within the Uxbridge bunker that second-by-second operational decisions were made. These decisions determined where and when RAF fighter squadrons would be scrambled to intercept incoming enemy raids. The operations room at Uxbridge became the centrepiece of this effort, a tightly run and efficient hub of military activity.
Central to its effectiveness was the Dowding System, named after Air Chief Marshal Sir Hugh Dowding. This was the world's first integrated air defence system, combining radar detection, ground-based observation, and radio communications. When enemy aircraft crossed the English Channel, they were first detected by a network of radar stations known as Chain Home. These stations transmitted information about altitude, bearing, and numbers back to Fighter Command. Simultaneously, members of the Royal Observer Corps, stationed throughout the countryside, provided visual confirmation and updates—particularly valuable at lower altitudes where radar was less effective.
All incoming reports were sent first to the filter room at Fighter Command HQ, where overlapping and duplicate sightings were sorted out. Once the filtered plots were prepared, they were passed directly to the operations rooms at group level, including Uxbridge. Here, the information was translated into real-time visual data and action.
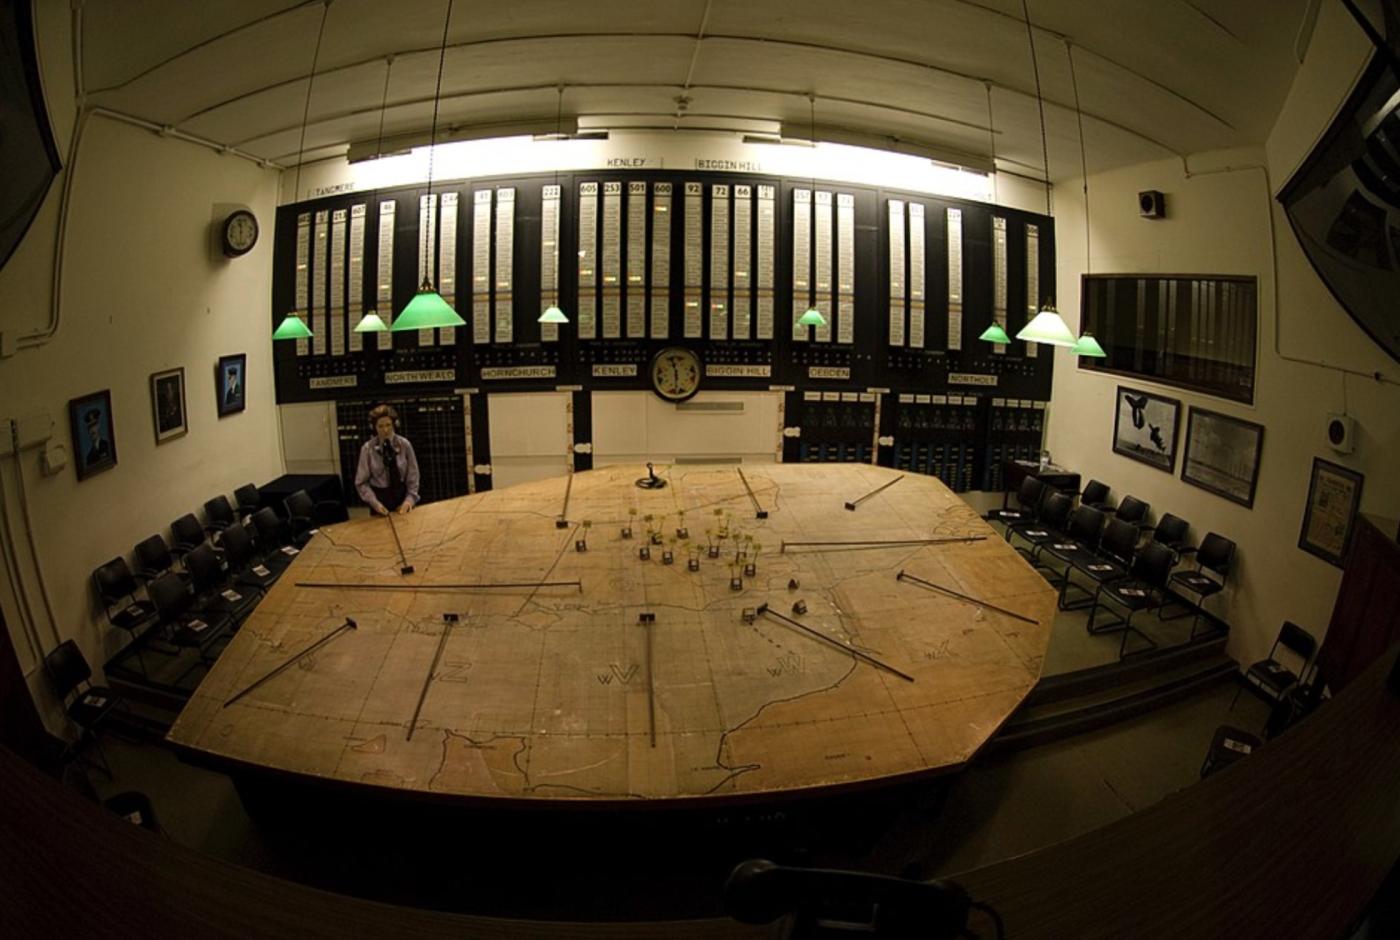
Inside the bunker, the operations room was built around a large plotting table bearing a detailed map of Southeast England and the English Channel. RAF aircraft, Luftwaffe formations, and sector boundaries were indicated by moveable counters and markers. These were updated continuously by members of the Women's Auxiliary Air Force (WAAF), who used long rakes to move the pieces across the map as new data came in. The plotters followed a strict timing code using coloured sectors—red, yellow, and blue—which corresponded to five-minute intervals, helping the officers estimate aircraft movement and predict future positions.
Overlooking the plotting table were raised galleries from which senior officers and duty controllers could observe the entire air picture and make decisions. When a Luftwaffe raid was detected, they would assess available squadrons, consider fuel levels, aircraft readiness, and weather, then issue scramble orders. These orders were relayed to the relevant sector airfields, such as Biggin Hill, Kenley, or Northolt, where pilots would be sent aloft within minutes. Every decision was a race against time, balancing urgency with precision. Errors could mean losing fighters unnecessarily or leaving British cities and infrastructure unprotected.
Though Uxbridge was primarily a Fighter Command post, it maintained close communication with Bomber Command and reconnaissance units. Bomber aircraft occasionally contributed vital intelligence, particularly through photographic reconnaissance missions over enemy airfields and staging areas in France and Belgium. While Bomber Command operations were directed elsewhere, coordination ensured that fighter patrols did not clash with bombing missions and could be redirected as necessary to support defensive efforts.
The smooth functioning of the Uxbridge command centre depended on a highly trained, disciplined staff. The WAAFs were essential to its success, managing communications, plotting data, maintaining logs, and ensuring that orders were passed accurately and efficiently. Many underwent rigorous training in aircraft recognition, communications protocols, and the specific procedures used in operations rooms. Alongside them, RAF officers, radio operators, and telephone teams worked in shifts around the clock, ensuring the chain of command remained uninterrupted.
When Luftwaffe formations moved beyond the 11 Group boundary, control would be handed off to adjacent groups such as 12 or 13. This seamless handover ensured continuity of defence across the country. The system prevented gaps in coverage and allowed Britain to use its limited resources with remarkable efficiency.
The Battle of Britain was ultimately a contest of attrition, will, and systems. While the heroics of RAF fighter pilots are rightly celebrated, the quiet coordination and tireless work of those inside the Uxbridge bunker were just as vital. Each interception, each successful defence, was the result of teamwork, fast information flow, and rapid decision-making that began beneath the ground in a low-ceilinged, steel-lined room filled with tension and resolve.
Today, the Battle of Britain Bunker at Uxbridge is preserved as a museum. Visitors can walk into the original operations room, see the plotting table, the clocks, the galleries, and the communications boards, and gain a vivid sense of how Britain's air defence was orchestrated. It remains a powerful symbol of how leadership, innovation, and unity in purpose can defy overwhelming odds and shape the course of history.