
On this day in military history…
The Battle of Stalingrad was one of the largest, bloodiest and most decisive battles of the Second World War. Fought between the forces of Nazi Germany and its Axis allies against the Soviet Union, the struggle lasted from 17 July 1942 until 2 February 1943 and became a brutal contest for control of the industrial city of Stalingrad on the River Volga. What began as part of a wider German offensive into southern Russia eventually developed into a vast battle of attrition that destroyed an entire German field army and marked a major turning point on the Eastern Front.
Following the failure to defeat the Soviet Union during Operation Barbarossa in 1941, Adolf Hitler launched a new campaign in the summer of 1942. Known as Case Blue, the offensive was intended to capture the oilfields of the Caucasus, depriving the Soviet Union of vital fuel while securing oil supplies for Germany. Stalingrad was not originally the main objective of the campaign, but its location made it strategically important. The city controlled important transport routes along the Volga, which carried oil, grain and military supplies from southern Russia to the Soviet heartland. It was also a major centre of industry, producing tractors, tanks, artillery and other military equipment.
The city’s name gave it enormous symbolic importance. Named after Soviet leader Joseph Stalin, its capture would have been a valuable propaganda victory for Hitler. As the campaign developed, both dictators became increasingly determined that the city should be held or taken regardless of the cost. This personal rivalry contributed to the scale and intensity of the fighting.
The main German force advancing towards Stalingrad was the Sixth Army, commanded by General Friedrich Paulus. It was supported by elements of the Fourth Panzer Army under General Hermann Hoth, as well as Romanian, Italian, Hungarian and Croatian formations. The initial German advance across the open steppe was rapid, but stretched supply lines and Soviet resistance gradually slowed the offensive.
The Soviet defence of the region was organised by the Stalingrad Front and later by the newly created Southeastern Front. General Andrey Yeryomenko commanded the wider Soviet forces, while Nikita Khrushchev served as a senior political representative. Lieutenant General Vasily Chuikov was given command of the Soviet 62nd Army, which was responsible for defending the city itself.
The first major clashes took place in July 1942 on the approaches to Stalingrad. Soviet troops attempted to delay the German advance along the River Don, but the Sixth Army continued moving eastwards. On 23 August 1942, German forces reached the Volga north of Stalingrad. On the same day, hundreds of aircraft from the Luftwaffe carried out a devastating bombing raid against the city.
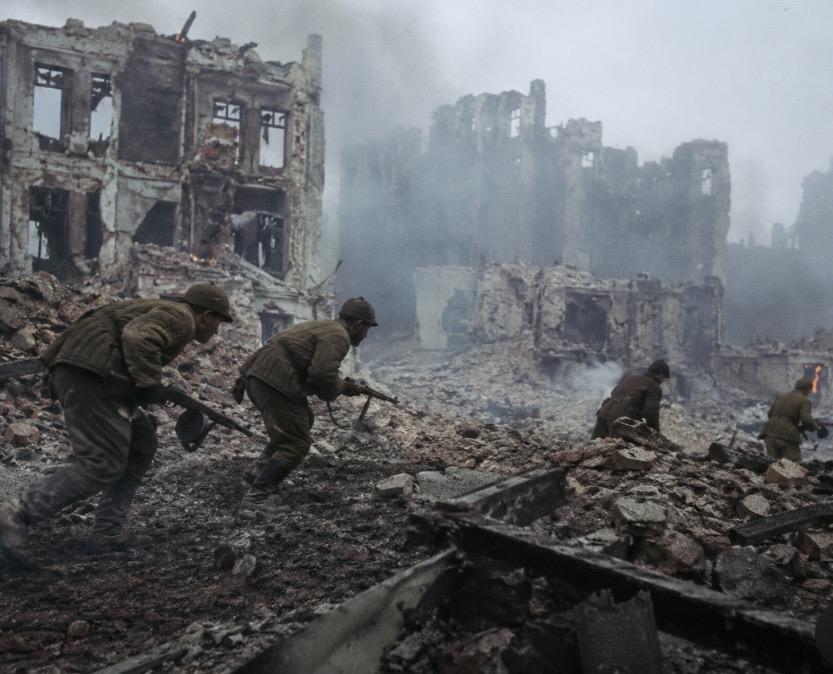
The aerial attack caused enormous destruction. Residential districts, factories, railway yards and port facilities were struck, and large areas of Stalingrad were reduced to burning ruins. Thousands of civilians were killed, although exact figures remain uncertain. The bombing failed to break Soviet resistance and instead created a battlefield of shattered buildings, collapsed walls, cellars and rubble, which later provided defenders with excellent cover.
German troops entered the outskirts of Stalingrad in September 1942. The Sixth Army expected to capture the city quickly, but the fighting became increasingly savage. The Soviets turned factories, apartment blocks, railway stations and warehouses into fortified strongpoints. Every street, floor, staircase and cellar could become the scene of a separate battle.
Chuikov ordered his men to remain as close as possible to the Germans. By keeping the opposing forces only a short distance apart, Soviet soldiers reduced the effectiveness of German artillery and air support, as German bombing risked hitting their own troops. This tactic became known as “hugging” the enemy.
The ruins of Stalingrad became the setting for some of the most intense close-quarter combat of the war. Soldiers fought with rifles, grenades, machine guns, bayonets, knives and even entrenching tools. Control of buildings and positions changed repeatedly. Soviet and German troops sometimes occupied different floors of the same building, while snipers targeted anyone moving through exposed areas.
One of the most famous Soviet defensive positions was Pavlov’s House, an apartment building overlooking an important square. A small group of soldiers led by Sergeant Yakov Pavlov fortified the building and held it against repeated German attacks for several weeks. The defenders surrounded the position with barbed wire and mines, created firing positions in the walls and maintained communication trenches linking the building to Soviet lines.
The railway station in central Stalingrad changed hands numerous times during the battle. Mamayev Kurgan, a large hill overlooking the city and the Volga, became another key position. Possession of the hill allowed observation over much of the battlefield, and it was repeatedly captured and recaptured. The soil became so heavily churned by artillery fire that it was filled with metal fragments and human remains.
The industrial district in northern Stalingrad became one of the main centres of resistance. The Red October steelworks, the Barrikady gun factory and the Dzerzhinsky Tractor Factory were defended with extraordinary determination. Tanks were sometimes driven directly from the production lines into battle, often before they had been fully painted or fitted with complete equipment.
Soviet reinforcements and supplies crossed the Volga under constant German artillery and air attack. Boats and barges carried soldiers, ammunition and food into the city and returned with wounded men and civilians. Many troops were killed before reaching the western bank. Despite enormous losses, the Soviet command continued feeding new units into Stalingrad.
Among the Soviet formations sent into the city was the 13th Guards Rifle Division under Major General Alexander Rodimtsev. In September 1942, the division crossed the Volga and immediately entered fierce fighting near the city centre and Mamayev Kurgan. Its arrival helped prevent the Germans from cutting the Soviet defenders in two.
Conditions for both sides were appalling. Soldiers lived among ruins, corpses and burning buildings. Food and clean water were scarce, and medical care was often limited. The smell of smoke, sewage and decomposing bodies filled the city. Rats infested cellars and trenches. Men suffered from exhaustion, disease and psychological strain as the fighting continued without relief.
German forces gradually pushed the defenders back towards a narrow strip of land beside the Volga. By November 1942, the Sixth Army controlled most of Stalingrad, but several Soviet bridgeheads remained. In some places, the defenders held ground only a few hundred metres wide. The Germans appeared close to victory, but their position had become dangerously exposed.
The German offensive had concentrated its strongest troops inside Stalingrad, leaving weaker allied armies to defend the long flanks north and south of the city. Romanian units guarded much of this front. Many were poorly equipped, lacked adequate anti-tank weapons and were spread over enormous distances. Soviet commanders recognised this weakness and prepared a massive counter-offensive.
The plan was developed under the direction of Generals Georgy Zhukov and Aleksandr Vasilevsky. Known as Operation Uranus, it aimed not at attacking the Germans inside Stalingrad directly, but at breaking through the Romanian armies on the flanks and surrounding the Sixth Army.
Operation Uranus began on 19 November 1942 with a huge Soviet artillery bombardment against Romanian positions north of Stalingrad. Soviet infantry and tanks then attacked through fog, snow and freezing conditions. The Romanian Third Army was quickly overwhelmed. The following day, Soviet forces attacked south of the city against the Romanian Fourth Army.
The two Soviet spearheads advanced rapidly across the steppe and met near the town of Kalach on 23 November. The encirclement trapped the Sixth Army, parts of the Fourth Panzer Army and several allied units inside a pocket around Stalingrad. Approximately 250,000 to 300,000 Axis troops were caught within the encirclement, although estimates vary.
Paulus and several senior German commanders initially considered breaking out while their forces still had fuel and mobility. Hitler refused to allow a withdrawal. He ordered the Sixth Army to remain in Stalingrad, claiming that it could be supplied by air until relief forces arrived.
The commander of the Luftwaffe, Hermann Göring, assured Hitler that the trapped army could be sustained by an airlift. This promise was unrealistic. The Sixth Army required hundreds of tons of supplies each day, including food, fuel, ammunition and medical equipment. The Luftwaffe lacked enough transport aircraft, suitable airfields and favourable weather conditions to maintain such an operation.
Soviet fighters, anti-aircraft guns, snowstorms and mechanical failures caused heavy losses among German aircraft. Deliveries fell far below the required amount. As food supplies ran out, soldiers were placed on reduced rations. Horses were slaughtered for meat, and eventually almost anything edible was consumed.
The main German attempt to relieve the Sixth Army was Operation Winter Storm, launched on 12 December 1942. Field Marshal Erich von Manstein organised a relief force led by elements of the Fourth Panzer Army. German tanks advanced from the southwest and reached within approximately 50 kilometres of the trapped army.
The relief operation offered Paulus a final opportunity to attempt a breakout, but Hitler continued to insist that Stalingrad must be held. Paulus also believed that his troops lacked enough fuel to fight their way out. The Sixth Army remained in position, and the Soviet Union launched further attacks elsewhere, forcing Manstein’s relief force to withdraw.
The Soviet command tightened the encirclement while also launching Operation Little Saturn against Italian and other Axis forces along the Don. This offensive threatened the entire German position in southern Russia and forced German armies in the Caucasus to begin withdrawing before they too were cut off.
Inside the Stalingrad pocket, conditions became increasingly desperate. The Russian winter brought temperatures far below freezing. Thousands of soldiers suffered from frostbite, dysentery, typhus, malnutrition and untreated wounds. Ammunition became scarce, vehicles could not operate because of a lack of fuel, and many artillery pieces fell silent.
Wounded men were crowded into cellars and makeshift hospitals with little medicine. Surgeons operated without proper anaesthetic, and many soldiers died from infection or exposure. German discipline began to collapse in some units, although others continued fighting with grim determination.
The Soviets launched their final offensive against the pocket, Operation Ring, on 10 January 1943. General Konstantin Rokossovsky commanded the forces responsible for destroying the surrounded army. Before the attack, the Soviets offered surrender terms, but these were rejected.
A massive artillery bombardment was followed by coordinated attacks from several directions. Soviet troops steadily reduced the size of the pocket, capturing airfields and cutting German units off from one another. The loss of Pitomnik and Gumrak airfields ended any realistic possibility of evacuating large numbers of wounded soldiers or receiving significant supplies.
By late January, the Sixth Army had been split into separate northern and southern pockets. German headquarters were established in the basement of the ruined Univermag department store in central Stalingrad. On 30 January 1943, Hitler promoted Paulus to the rank of field marshal. No German field marshal had ever surrendered, and the promotion was widely interpreted as a suggestion that Paulus should commit suicide rather than be captured.
Paulus refused to take his own life. On 31 January, Soviet troops entered his headquarters, and he surrendered along with the southern part of the pocket. The remaining German forces in the northern factory district continued fighting until 2 February 1943, when they also surrendered.
The defeat was catastrophic for Germany. Around 91,000 German and Axis soldiers were taken prisoner at the end of the battle, including 24 generals. Many were already severely weakened by hunger, illness and exposure. Only a small proportion of the prisoners survived Soviet captivity and eventually returned home, with the last large group released in 1955.
The total losses at Stalingrad were enormous and remain difficult to calculate precisely. The Soviet Union suffered more than one million casualties, including killed, wounded, missing and captured, during the wider campaign. Axis losses were also counted in the hundreds of thousands. Civilians suffered terribly, with much of the city destroyed and many thousands killed or displaced.
The battle became a powerful symbol of Soviet sacrifice and resistance. For the first time, an entire major German army had been surrounded and destroyed. The victory greatly increased Soviet morale and damaged the reputation of German military invincibility. It also encouraged resistance movements and strengthened confidence among the Allies that Nazi Germany could be defeated.
Stalingrad did not immediately end the war in the East, and Germany remained capable of launching further major operations, including the Battle of Kursk in July 1943. However, the strategic initiative increasingly passed to the Soviet Union. From Stalingrad onwards, the Red Army began a long and costly advance westward that would eventually carry it into Berlin.
The battle also exposed the consequences of Hitler’s interference in military decision-making. His refusal to allow the Sixth Army to withdraw when a breakout may still have been possible condemned hundreds of thousands of men. The failed airlift, the weakness of the Axis flanks and the underestimation of Soviet reserves all contributed to the disaster.
The city of Stalingrad was later rebuilt and renamed Volgograd in 1961. Mamayev Kurgan became the site of an enormous memorial complex dominated by the statue known as The Motherland Calls. The monument stands above the battlefield as a reminder of the sacrifice made by Soviet soldiers and civilians.
The Battle of Stalingrad remains one of the defining events of the Second World War. It was a battle fought not only by armies and commanders, but by ordinary soldiers and civilians struggling to survive in one of the most destructive environments ever created by war. Its outcome shattered Germany’s hopes of victory in the Soviet Union, preserved vital Soviet transport routes and resources, and began the slow reversal of Nazi expansion in Europe.