
On this day in military history…
On 22 July 1943, troops of Lieutenant General George S. Patton’s United States Seventh Army captured Palermo, the capital and largest city of Sicily. The fall of the city came only twelve days after the Allied invasion of the island and represented one of the most dramatic advances of Operation Husky. American armoured and infantry formations had driven rapidly across western Sicily, overcoming scattered resistance, difficult roads, extreme heat and the logistical strain of moving thousands of men and vehicles through mountainous country. The capture of Palermo gave the Allies control of one of Sicily’s most important ports and demonstrated that the Italian forces defending the western half of the island were close to collapse. It also greatly enhanced Patton’s reputation as an aggressive field commander, as his advance covered approximately 100 miles in only a few days and brought the Americans into the city before many Allied planners had expected Palermo to be taken.
Operation Husky had begun during the night of 9–10 July 1943 and was the largest amphibious operation of the war up to that point, bringing British, American and Canadian forces ashore along the southern and south-eastern coasts of Sicily. The invasion was commanded by General Sir Harold Alexander’s 15th Army Group, which consisted of General Bernard Montgomery’s British Eighth Army in the east and Patton’s Seventh Army in the west. The original Allied plan gave the British the principal offensive role, with Montgomery’s forces expected to advance northwards through the eastern part of the island, capture the important ports of Syracuse, Augusta and Catania, and then push towards Messina. The Americans were initially expected to protect the British left flank, secure the western beachhead and prevent Axis forces from attacking the invasion area from the interior.
Patton disliked this limited role and was determined to demonstrate that the newly formed Seventh Army was capable of conducting major offensive operations. The American landings around Gela, Licata and Scoglitti had faced strong resistance, including a counterattack by the German Hermann Göring Division, but once the beachheads had been secured, American forces began advancing inland. The Allied plan soon encountered difficulties as Montgomery’s advance towards Catania was slowed by determined German resistance, mountainous terrain and heavily defended roads. The German commander in Sicily, General Hans-Valentin Hube, concentrated many of his strongest units in the east to block the British route towards Messina, and as the Eighth Army’s progress slowed, a greater area of responsibility opened to the Americans.
Palermo became an increasingly attractive objective. The city possessed a large harbour, railway facilities, warehouses and road connections that could support further Allied operations. Capturing it would remove the principal administrative and communications centre in western Sicily and provide the Seventh Army with a port much closer to the front than the original invasion beaches. The city also held considerable symbolic importance, having been the capital of Sicily for centuries and home to hundreds of thousands of people. Its loss would send a powerful message to both the Italian population and the Fascist government in Rome that the defence of the island was failing.
Patton received authority to move westwards and northwards across the island and reorganised his forces for a rapid advance, creating a provisional corps under Major General Geoffrey Keyes. This formation included Major General Hugh Gaffey’s 2nd Armored Division, elements of Major General Lucian Truscott’s 3rd Infantry Division and units of the 82nd Airborne Division. The 2nd Armored Division, known as “Hell on Wheels”, would provide the speed and striking power needed for the drive on Palermo, with its tanks, armoured cars, trucks and self-propelled artillery expected to break through opposition and exploit the disintegration of the Italian defences, while infantry units followed to secure towns, collect prisoners and protect the long supply routes stretching back towards the southern coast.
The western offensive began in earnest on 19 July as American columns pushed through central and western Sicily along several routes. The countryside was dry, dusty and mountainous, with twisting roads that frequently passed through narrow villages and steep valleys. Demolished bridges, abandoned vehicles and crowds of prisoners slowed the advance, while the intense summer heat exhausted both men and machines. Italian resistance varied considerably, with some positions fighting stubbornly, particularly where artillery or coastal defence units occupied prepared fortifications, while elsewhere entire formations surrendered after only limited fighting. Many Italian soldiers were poorly equipped, badly supplied and deeply discouraged, as the defeat in North Africa, the bombing of Italian cities and the growing belief that the war was lost had severely weakened morale.
The Italian Sixth Army was responsible for the defence of Sicily, but many of its divisions were static coastal formations with limited mobility and outdated equipment, expected to delay an invasion rather than defeat one. The most capable Axis formations, including the German Hermann Göring Division and the 15th Panzergrenadier Division, were increasingly concentrated in the eastern half of Sicily, where they could block the approaches to Messina. As the Americans advanced, they captured large numbers of Italian troops, many of whom surrendered in groups, sometimes after their officers had abandoned them or communications with higher headquarters had broken down. American soldiers also encountered civilians who welcomed the end of Fascist rule and hoped that the fighting would move away from their homes.
Patton travelled close behind the leading formations, urging his commanders to maintain momentum, understanding that speed was essential. If the Italians were given time to reorganise around Palermo, the approaches to the city could become difficult to force, as the mountains surrounding the coastal plain offered many potential defensive positions and demolished roads and bridges could delay an armoured advance. The American drive was conducted along more than one axis, with the 3rd Infantry Division advancing towards the city from the east while the 2nd Armored Division approached from the south and west. Reconnaissance units raced ahead searching for roadblocks, enemy positions and intact bridges, while engineers followed closely to clear mines, repair damage and open routes for tanks and supply vehicles.
One of the most important clashes occurred around the road junction at Corleone, south of Palermo, where American forces captured the town after overcoming resistance and continued towards the northern coast. Other columns passed through towns including Ribera, Sciacca and Castelvetrano as the Seventh Army swept across western Sicily. The rapid American movement caused widespread confusion among the defenders, as Italian commands received incomplete or outdated information about the location of enemy formations. Telephone lines had been cut, roads were crowded with retreating soldiers and vehicles, and Allied aircraft made daytime movement increasingly dangerous.
The Axis command faced a difficult strategic choice, as defending Palermo would require troops urgently needed in the east. The Germans had already concluded that the decisive battle for Sicily would be fought along the approaches to Messina, where the evacuation route to mainland Italy could be protected, and as a result few German units were available to assist the Italians in the defence of the capital. Palermo itself had suffered repeated air raids before the American arrival, with its harbour, railway yards and military installations attacked by Allied bombers, causing extensive destruction and many civilian casualties. Whole districts had been damaged, public services were disrupted and thousands of residents had fled or taken shelter outside the city.
By 21 July, American armoured columns were approaching the outskirts, and Italian commanders recognised that a prolonged defence was unlikely to succeed. The city contained several thousand soldiers, police and military personnel, but many lacked effective weapons, transport or clear orders, and the arrival of American tanks and armoured vehicles created further panic among troops already shaken by the speed of the advance. On 22 July, leading elements of the 2nd Armored Division reached the approaches to Palermo, and Major General Keyes and Major General Gaffey entered the city with representatives of the Italian command. Shortly after seven o’clock that evening, the formal surrender was accepted at Palermo’s Royal Palace.
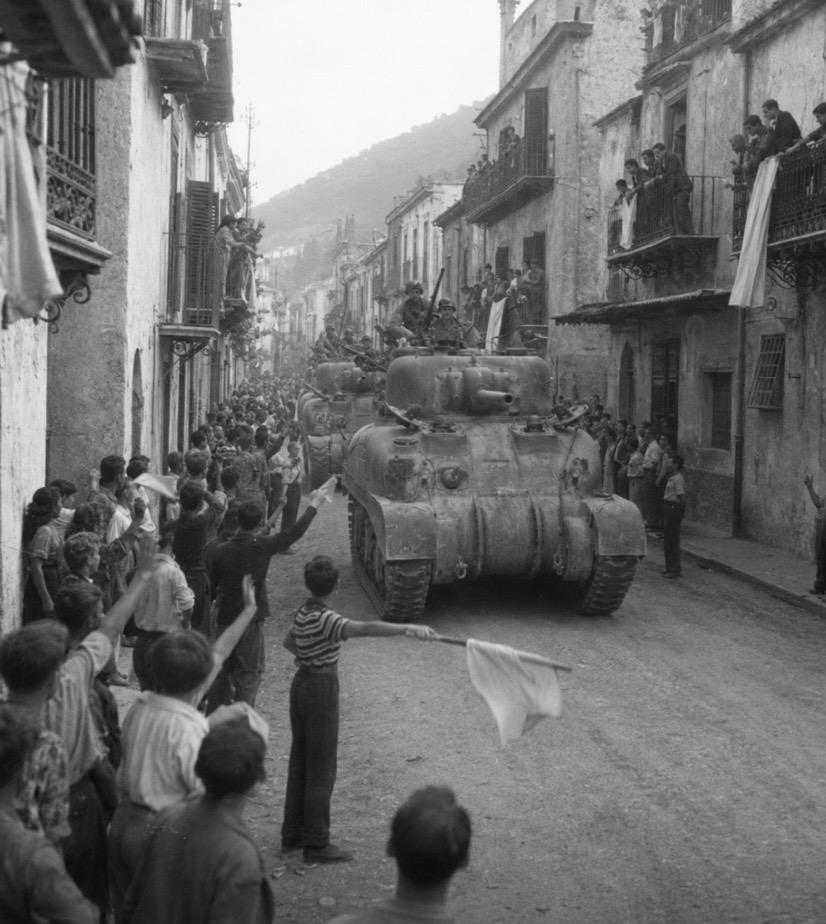
At approximately eight o’clock, American forces entered the city from the east and west, with tanks, armoured cars, jeeps and infantrymen moving through streets crowded with civilians. In many areas, the troops were greeted with cheers, flowers, wine and offers of food, as residents waved white flags, American flags and handkerchiefs from windows and balconies. Not every reaction was celebratory, however, as Palermo had endured years of war, shortages and bombing, and many inhabitants were concerned mainly with finding food and protecting their families. Buildings had been reduced to rubble, water and electricity supplies were damaged, and unexploded bombs remained scattered around the city.
The Americans took thousands of prisoners during the occupation of Palermo and the surrounding region, with many Italian troops surrendering without resistance while others discarded their uniforms and attempted to return home. The sudden collapse of organised defence left American units with the difficult task of guarding prisoners, restoring order and distributing emergency supplies. The harbour was a major prize, although bombing and demolition had damaged many facilities, and engineers and naval personnel immediately began inspecting the docks, clearing wreckage and preparing the port to receive Allied shipping. Once repaired, Palermo greatly shortened the supply route to the Seventh Army and reduced dependence on the exposed landing beaches in southern Sicily.
The capture of the city also completed the isolation of much of western Sicily, as American forces rapidly occupied the remaining ports, airfields and towns in the region. Trapani, Marsala and other important locations fell as Italian resistance disintegrated, and within a few days the Seventh Army controlled almost the entire western half of the island. Patton made a triumphant entry into Palermo after the surrender, his arrival carefully observed by soldiers, civilians and war correspondents. Dressed in his distinctive uniform and carrying his ivory-handled pistols, he appeared to embody the aggressive spirit of the American advance.
The victory strengthened his standing within the Allied command, as before the invasion there had been doubts about the combat effectiveness of some American formations following mixed results in North Africa. The drive across Sicily demonstrated that the Seventh Army could move quickly, coordinate armoured and infantry forces and exploit a collapsing enemy front. However, the advance on Palermo did not destroy the main German forces on the island, as Hube had used the time gained by resistance in the east to establish a series of defensive lines protecting Messina. German units remained organised, well equipped and determined, while the mountainous terrain of north-eastern Sicily strongly favoured the defenders.
After taking Palermo, Patton turned his attention eastwards, and the Seventh Army began advancing along Sicily’s northern coast and through the mountainous interior towards Messina. The campaign now became a race between the British and Americans, although both armies encountered fierce German opposition. The roads along the northern coast were narrow and vulnerable to demolition, with bridges blown, cliffs overlooking the routes and German rearguards establishing strong positions around towns and road junctions. Progress slowed considerably compared with the rapid sweep through western Sicily.
Some of the hardest fighting of the campaign took place after Palermo had fallen, as American forces fought difficult battles around Troina, San Fratello and Randazzo. German troops used mines, artillery and carefully prepared defensive positions to delay the Allied advance while preparations were made to evacuate Axis forces across the Strait of Messina. The fall of Palermo nevertheless had important political consequences, as news of the city’s capture reached Rome at a moment when confidence in Benito Mussolini’s leadership was already collapsing. Italian cities were being bombed, the army was suffering defeats on several fronts and Allied troops were advancing on Italian territory for the first time.
Only three days after Palermo fell, Mussolini was removed from power, as on 25 July the Fascist Grand Council’s vote against him was followed by his dismissal and arrest on the orders of King Victor Emmanuel III. Marshal Pietro Badoglio became head of a new government, publicly declaring that Italy would continue the war while secretly exploring the possibility of an armistice with the Allies. The loss of Sicily’s capital was not the sole cause of Mussolini’s downfall, but it provided undeniable evidence that Fascist Italy could no longer defend its own territory, and the image of American tanks moving through Palermo’s streets had a devastating effect on the regime’s prestige.
For the Sicilian population, the capture brought both relief and uncertainty, as Fascist authority disappeared quickly but food shortages, damaged infrastructure and unemployment remained. Allied military government officers assumed responsibility for administration, public safety, health and the distribution of supplies, while local officials who had served under the Fascist regime were removed or closely supervised. Carabinieri and civilian police were gradually returned to duty under Allied control, and emergency measures were introduced to prevent looting, restore communications and reopen markets.
The Americans also faced the complex social and political conditions of Sicily, as the island had suffered from poverty, corruption and organised crime long before the war. The destruction of state authority created opportunities for local power groups to re-emerge, while the Allies often had limited knowledge of the individuals appointed to administrative positions. Despite these difficulties, Palermo quickly became an important Allied base, with the harbour handling supplies, vehicles and reinforcements while nearby airfields supported operations over Sicily and southern Italy. Hospitals, repair facilities and command posts were established in and around the city.
The capture of Palermo showed the value of mobility and aggressive exploitation, as Patton recognised that the Italian forces in western Sicily were vulnerable and pushed forward before they could recover. His use of the 2nd Armored Division allowed the Americans to move faster than the retreating defenders expected. The operation was not without risk, as the advancing columns were sometimes far ahead of their supply units and many roads were unsuitable for heavy traffic. Fuel shortages, mechanical breakdowns and destroyed bridges could have brought the movement to a halt, and had strong German forces been present in western Sicily, the extended American formations might have faced a serious counterattack.
Instead, the Axis decision to concentrate in the east allowed the Seventh Army to achieve a striking territorial victory, as the American advance captured large numbers of prisoners and secured approximately half of the island, though the main German formations escaped destruction and continued fighting. The wider Sicilian campaign ended on 17 August 1943, when American troops entered Messina shortly before the British, by which time the Germans and Italians had evacuated more than 100,000 troops, thousands of vehicles and large quantities of equipment across the strait to mainland Italy.
Although the Axis evacuation prevented the Allies from achieving a complete battlefield victory, Operation Husky had accomplished several major objectives, as Sicily was removed from Axis control, Mediterranean shipping routes became safer and the invasion contributed directly to Mussolini’s downfall. The campaign also provided valuable experience in amphibious warfare, airborne operations, logistics and cooperation between ground, naval and air forces. The capture of Palermo remains one of the most memorable episodes of the campaign, as in less than two weeks the American Seventh Army had progressed from fighting for survival on the invasion beaches to occupying Sicily’s capital. The speed of the advance surprised both friend and enemy and transformed the role of Patton’s army from flank protection into a major offensive force.
For Palermo, 22 July 1943 marked the end of Fascist and Axis control after years of dictatorship, bombing and deprivation, as American tanks entering the city symbolised the rapid collapse of Italian resistance in western Sicily and the beginning of the Allied advance towards mainland Europe. The victory did not end the fighting on the island, nor did it prevent the German army from withdrawing to continue the war in Italy, but it did deliver a strategically valuable port, a major political blow against Mussolini’s regime and a dramatic demonstration of American armoured mobility. The fall of Palermo was one of Patton’s most visible triumphs and an important step in the Allied campaign that would eventually carry the war from North Africa into the heart of Italy.