Pegasus Bridge Attack
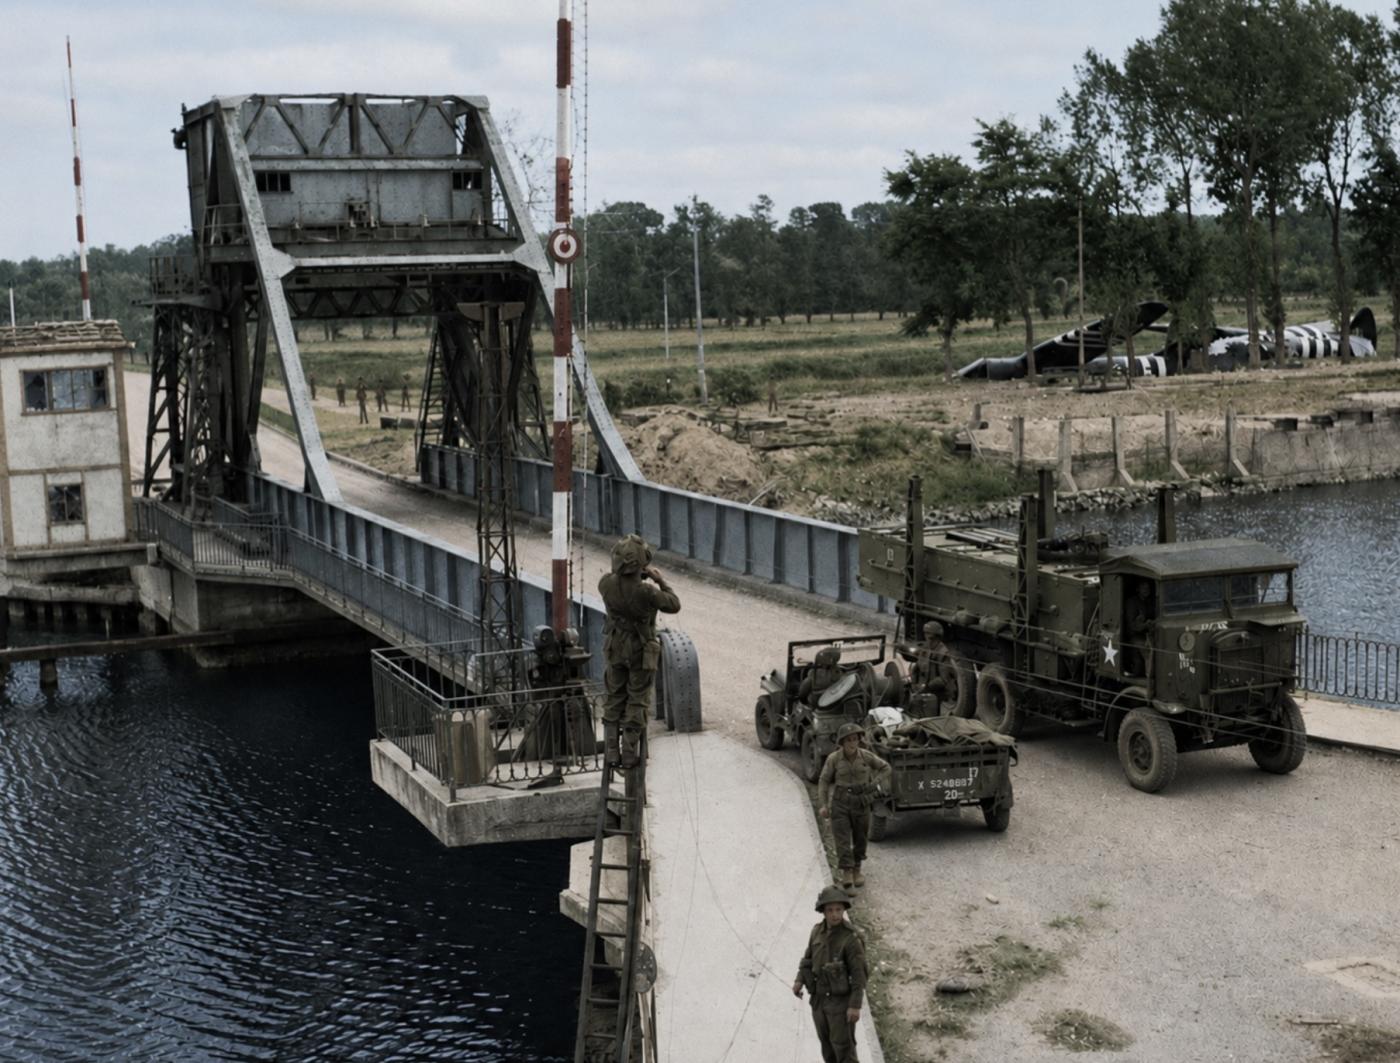
In the first minutes of 6 June 1944, before the great armada was visible off the Normandy coast and before the first assault troops had landed on the beaches, a small British airborne force was already committed to one of the most daring and precise operations of the Second World War. Their task was simple to describe but immensely difficult to carry out: seize two vital bridges intact, hold them against counter-attack, and prevent the Germans from using them either to strike the invasion beaches or to cut off the airborne troops landing east of the River Orne. The best known of these bridges was the crossing over the Caen Canal at Bénouville, later immortalised as Pegasus Bridge.
The assault formed part of the wider plan for Operation Overlord. On the eastern flank of the invasion area, British 6th Airborne Division was ordered to land during the night and protect the left flank of the seaborne landings. Its objectives included destroying bridges over the River Dives to delay German movement, attacking the Merville Battery, and holding the ground between the Orne and the Dives until relieved by troops advancing inland from Sword Beach. The bridges at Bénouville and nearby Ranville were central to this plan. The Caen Canal bridge and the River Orne bridge offered the only practical crossings in that immediate area. If the Germans held them, they could move armour and infantry westwards against the beaches. If they destroyed them, the British airborne forces east of the waterways could find themselves isolated. The bridges therefore had to be captured quickly, captured intact, and held.
The mission was given to Major John Howard and D Company, 2nd Battalion, Oxfordshire and Buckinghamshire Light Infantry, reinforced by two platoons from B Company and Royal Engineers. It was a coup de main operation, meaning a sudden direct blow aimed at overwhelming the defenders before they could react. This was not to be a parachute drop some distance away followed by a march to the objective. Howard’s men were to land almost on top of the bridges in Horsa gliders, burst out under cover of darkness, and take the positions before the German sentries could organise a defence or destroy the structures.
The glider element was crucial. The Airspeed Horsa was a large wooden assault glider capable of carrying a platoon-sized load of infantry. It had no engine of its own and was towed towards the target by bomber aircraft before being released to glide silently into enemy territory. The advantage was surprise. The danger was obvious. A glider landing at night, in small fields close to water, trees, wire, enemy posts, and bridge obstacles, left almost no margin for error. A misjudged approach could scatter the force, smash the aircraft, or leave the assault troops too far from the bridges to achieve surprise.
Howard trained his men relentlessly. They practised night attacks, bridge assaults, rapid movement from gliders, and the clearing of enemy positions. Every man had to know his task and the tasks of those around him, because confusion after landing was inevitable. The operation depended on speed and initiative. The bridges had to be rushed at once. Any pause would give the defenders time to fire, set charges, or call for support. Howard’s company became, in effect, a hand-picked striking force, heavily drilled and mentally prepared for a few violent minutes that might influence the success of the landings to follow.
Late on 5 June 1944, six Horsa gliders carrying the assault force took off from RAF Tarrant Rushton in Dorset. They were towed across the Channel by Halifax bombers. In the darkness below lay the Normandy coast, German anti-aircraft defences, flooded fields, and the two waterways that marked the eastern edge of the British invasion front. The men inside the gliders waited in silence, packed with weapons, ammunition, grenades, and equipment. They knew that once released, there would be no turning back, no engine to correct a major error, and no second attempt.
The navigation and flying were remarkable. At around sixteen minutes past midnight, the first three gliders came down beside the Caen Canal bridge with extraordinary accuracy. One landed so close to the bridge that its nose finished only yards from the objective. The impact was violent, throwing men about and stunning some of them, but the landings achieved exactly what the plan required. The defenders were surprised. Howard’s men were at the bridge before the Germans fully understood what was happening.
The assault across the Caen Canal bridge was led by Lieutenant Den Brotheridge’s platoon. The men rushed forward firing Sten guns, rifles, and Bren guns, throwing grenades into trenches and weapon pits. The bridge was crossed in a rush. Brotheridge was mortally wounded during the attack and is often remembered as the first British officer killed by enemy fire on D-Day. His death came at the very opening of the invasion, before the beach landings had begun, and it gave the success at Pegasus Bridge a personal cost from its first moments.
The fighting was brief but intense. German defenders were killed, wounded, captured, or driven off. The Royal Engineers moved quickly to examine the bridge for demolition charges. The attackers had feared that the Germans might have wired the bridges for destruction, but the demolition arrangements were incomplete or not ready for immediate firing. The bridge was secured intact. At the same time, the other platoons dealt with nearby defensive positions, including trenches, machine-gun posts, and buildings around the bridge. Within minutes, the Caen Canal crossing was in British hands.
The assault on the River Orne bridge at Ranville, later known as Horsa Bridge, was carried out at the same time by the gliders assigned to that objective. That crossing too was captured quickly. One of the six gliders, however, landed far from the intended target near the River Dives, showing just how fine the margin had been. Had all the gliders been scattered in that way, the operation might have failed. Instead, five had landed close enough to their objectives to allow Howard’s men to achieve surprise at the decisive point.
The capture of the bridges was only the first part of the task. Holding them was another matter. Howard’s force was small, deep in enemy-held territory, and vulnerable to counter-attack. The Germans soon began probing the area. There were exchanges of fire, mortar and machine-gun threats, and the danger of armoured vehicles approaching the bridge. One German tank or self-propelled gun was knocked out near the canal bridge, often associated with the use of a PIAT anti-tank weapon by the defenders. The psychological effect of this was important. It showed that the British were ready to resist armour and helped check immediate German efforts to regain the crossing.
Howard established a defensive perimeter and waited for reinforcement. The men of D Company and the attached troops had to hold their ground through the uncertain hours before dawn, when scattered airborne units were still trying to assemble and German reactions were confused but dangerous. The bridge position became a fixed point in the darkness, a small island of British control surrounded by an enemy still trying to understand the scale of the invasion.
Reinforcements from 7th Parachute Battalion began to arrive during the early hours. These men had been dropped as part of 6th Airborne Division’s wider landing and had suffered the usual scattering and confusion of night parachute operations. Even so, enough reached the bridge area to strengthen the defence. The airborne troops held on as daylight came, and with daylight came the wider reality of D-Day: seaborne landings on the Normandy beaches, naval gunfire offshore, aircraft overhead, and German forces attempting to determine where the main Allied effort was falling.
The link-up from the beaches came later on 6 June. Commandos of 1st Special Service Brigade, advancing inland from Sword Beach under Brigadier Lord Lovat, reached the bridge area and relieved the airborne defenders. The story is often remembered with the figure of Piper Bill Millin, who played as Lovat’s men advanced, creating one of the most enduring images of the British sector on D-Day. For Howard’s men, the arrival of the commandos meant that the bridgehead had survived the most dangerous hours. The airborne coup de main had succeeded.A coded message was sent back to HQ “ham and jam” meaning a successful mission to secure the bridges was very well received.
The name Pegasus Bridge came from the winged horse emblem of British airborne forces. The nearby Orne bridge became known as Horsa Bridge, after the gliders that had carried the assault troops into battle. These names gave the action a symbolic quality, but the importance of the operation was not symbolic alone. By seizing the bridges intact, Howard’s force helped secure the eastern flank of the invasion area. They prevented the Germans from using the crossings for an immediate counter-stroke against Sword Beach and ensured that British airborne troops east of the Orne were not cut off from the forces landing from the sea.
The assault also demonstrated the value of careful preparation, accurate intelligence, and disciplined small-unit leadership. It was a mission in which seconds mattered. The training beforehand allowed junior leaders and individual soldiers to act decisively when the gliders crashed down and the plan met the reality of battle. The glider pilots also deserve particular recognition. Their navigation and landing accuracy in darkness were among the outstanding achievements of the operation. Without their skill, Howard’s men would not have been delivered close enough to the bridges to seize them by surprise.
Pegasus Bridge has endured in British military memory because it contains many of the elements that make an action legendary: a vital objective, a small force, darkness, surprise, precise flying, violent close combat, and success against heavy consequences if failure had occurred. Yet it should not be seen merely as a romantic episode. It was a hard tactical operation carried out by men who had trained for a specific task and then performed it with exceptional discipline. The casualties, including Den Brotheridge and Lance Corporal Fred Greenhalgh, who died after one of the glider landings, remind us that even a brilliantly successful operation came at a human cost.
In the wider story of D-Day, Pegasus Bridge was one small part of an immense undertaking, but it was one of the first blows struck and one of the cleanest successes of the day. Before the landing craft touched down on Sword, Juno, Gold, Omaha, and Utah, British airborne troops had already crossed into history beside the Caen Canal and the River Orne. Their victory did not win the Normandy campaign by itself, but it helped make the landings safer, protected the eastern flank, and gave the invading army a secure foothold at a crucial point. For that reason, the assault on Pegasus Bridge remains one of the most celebrated airborne operations of the Second World War.